Maslow CNC with Panel Saw mod by John Montani.
Files
Edit this page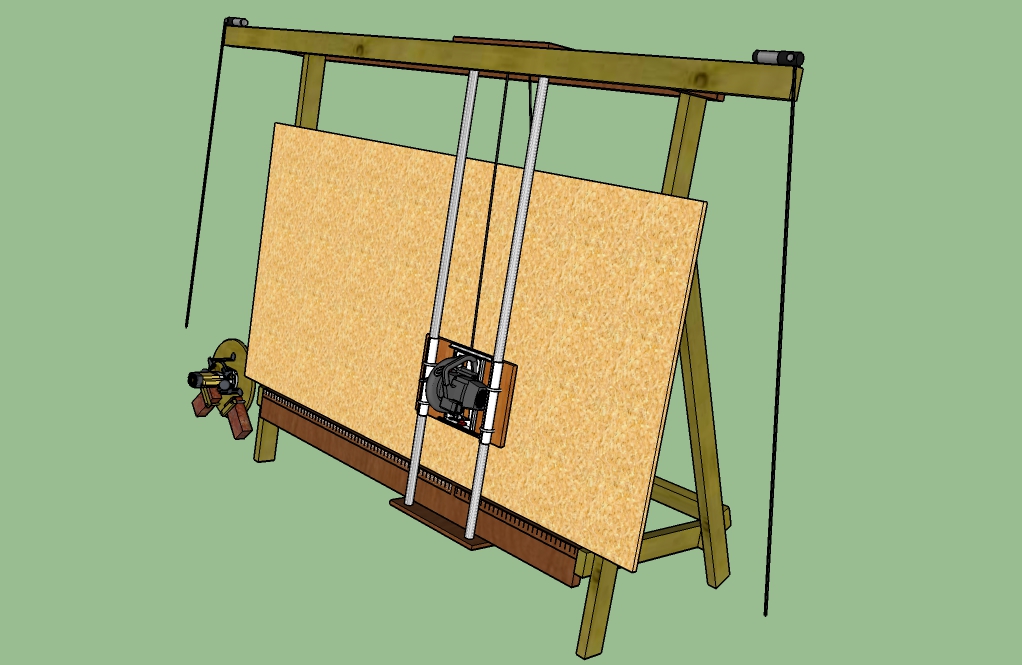 | Download FilesSource |
Maslow CNC with Panel Saw mod by John Montani.
This is a Sketchup model in 3d Warehouse of the Maslow CNC and my panel saw adapted to the Maslow frame. by John Montani
Instructions
Edit this pageThe panel saw conversion is actually my working panel saw with the identical frame for the past 11 years. I could not resist sharing the concept for those that would like a very handy 2 in 1 machine. The pieces to build the unit and add to your Maslow CNC can all be purchased from local lumber yard, hardware store, big home improvement store or pieces in your garage or workshop now. The build will cost about $90 to $200 including your choice of hand circular saw. I use my trusted Black& Decker 7 ¼” saw from 1978 and still going strong! I have posted all my 3D CAD into Sketchup. It is free for basic download for everyone to use. You will find measurements and build items on the 3D CAD. I will dare to say that measurements may vary slightly from one person’s Maslow CNC build and another’s. So keep to the concept and check for the clearance depth for your saw cuts and rail clearance with the Maslow frame. Keep in mind your circular saw may be heavier duty and larger than mine and you will need to adjust measurements proportionally. The concept is simple. Two EMT Pipe as slide rails, two cut pieces of PVC pipe used as slide bearing surfaces mounted in parallel on plywood saw platform using screws and U bolts. The rails are kept in parallel with a top and bottom rail supports made of plywood, with the saw assembly counter weighted with brick and cable attached trough pulleys at the top. The added bottom plate which will be removed when not using the panel saw will have stick on tape measure for easy cutting.
WARNING: For all the DIY nuts like myself you will probably look at my concept 3D CAD and build it your way and that’s OK. Not every MASLOW frame is exactly alike and may be different shape. This is a simple and cheap panel saw that has worked for a lot of years for me. This write up is strictly from memory so I am sure I left something out just like my missing parts of my memory! Best of luck with your build.
- You will need to replace the 7” pieces of 2x4 used to extend the Top Beam of the Maslow with two 8” pieces of 2x4 for tube rail clearance behind the Top Beam.
- Attach the 2x4 top support from the cut pieces to the back side of the Top Beam extenders.
- In my example you will cut to rail support frames from ¾” plywood 11” x 19”. There are two holes needed to be drilled for the EMT Pipe 1 ¼”. Do this by securing both pieces together and drill the holes through both pieces of plywood at same time to ensure the rails will be parallel. Make sure to mark the top side on each panel. You will use the U Bolt plates as the tube stops when done.
- Cut the 1 ¼” EMT Pipe to the specified length. NOTE: You may want to not cut the EMT Pipe until you have installed the rail support plates to make sure correct length and there is no movement when sliding the saw assembly. For smoother sliding of the panel saw you can polish the tubes with a buffer.
- Measure the ID of your support legs on your Maslow CNC and cut the 2x6 board to fit. This should fit as shown in the CAD images where the Maslow uses the kicker pieces to hold the panel being cut on the Maslow. You will place the top edge of the 2x6 with the top edge of the kicker 2x4 for a full length support for cutting panels on the panel saw. Screw through the ends of the 2x4 into the ends of the 2x6. Pre drill holes first through the 2x4 end. This will make for easy removal of the panel saw assembly and convert back to the CNC.
- In the cut pieces is a 2x4x19”, secure that board length on the back edge of one of the rail support plates labeled up. Secure with plenty of 2 ½” or 3” screws. This when attached to the back side of the 2x6 will make a stronger support when screwed to the 2x6 through the 2x4 and through the plywood.
- With the 2x6 installed on the Maslow, place the rail support plate just made to the 2x6. Position it to the right side of the plywood back panel approximately 24 inch from the end. This will ensure plenty of support for the boards you are cutting with the saw.
- NOTE: To make sure the rails are perpendicular to the 2x6 bottom plate for square cutting, take a crap piece of plywood and make a 90 degree framers square. Screw a pieces of 2x4 to the edge and the place on the 2x6. You can now place a piece of EMT pipe through the hole in the plate and use a spring clamp to hold while mounting the top rail support.
- Attach the top rail support with the rails through the holes and using spacer blocks to make sure the rails are parallel with the back panel. Secure with screw to both the Maslow Top Beam and the newly added rear support 2x4. The U Bolt plates are good to screw across the holes to hold the rails into place. A piece of scrap plywood works as well.
- First step in making the saw slide. Cut two pieces of the PVC pipe to 12” long. It is best to use a table saw for this step. Using the guide stop on one side and a temp guide for the left side, rip a straight cut through the length of the pipe. Rotate an 1/8” and make the cut slightly larger. You will notice this cut in my images.
- With the rails mounted to the frame place the plywood slide plate behind the rails. Use scrape materials to push the plywood against the rails. Remove the bottom rail stops lowering the rails enough to slide the PVC pipe on each rail, then re-install the rails and stops.
- Slide the PVC with the vertical cut facing outward in front of the plywood saw plate. With a counter sink drill bit, drill two or three holes through the open slot, through the PVC and into the ¾” plywood. #6 tapered head brass screws ½” long should work fine. Make sure the heads recess into the PVC.
- Test slide the panel saw plate gently up and down. If binding occurs, one or both of the rails can be adjusted in the top holes. You may find having one of the rail support holes sanded enough for any wiggle room needed during vertical movement of the panel saw.
- Next place your U bolts over the PVC 2” from the bottom edge and 8” from the bottom edge. The U bolts should be cut to length no longer than the backside of the plywood saw plate. Mark each hole by pencil trace each U bolt to the saw plate.
- It is best to remove the slide plate and use drill press for U Bolt holes. On back side recess the holes with large enough drill bit to completely recess the nuts on the U bolts. Large enough to use socket is best.
- Before re-installing the slide, place a cut piece of the aluminum ½”x ½” L stock on the front leading edge of the saw plate to support the front edge of the circular saw. Check to make sure square with saw plate and rails.
- Place you circular saw front edge up against the L stock and install cut L stock to each side of the saw base plate and also against the rear. You will also need to find four locations to drill and place four screws through the saw base plate securing to the plywood saw plate.
- Once completed with the saw mounted place pieces of scrap 2x4 lengthwise under the saw plate and plunge cut the slot through the plywood saw plate. By design the blade only need to extend enough to touch the back panel, toughly 1 1/8”. I have assumed no plywood panels larger than 1” deep wood be cut. So plunge cut just past the need amount then raise the blade.
- Place the slide back onto the rails and tighten U bolts to take any extra slide wiggle room. And then re-install rails and stops.
- Test the slide. And adjust as needed.
- Lastly attach the two pulleys to the bottom of the top rail support as shown. Using the stranded cable attach to the panel saw plate using S hook, then through the pulleys to a stack of bricks enough to gently raise the saw plate back to the top and hold it there.
- Once the cable has been attached and the saw plate is now at the top. Place the simple handle on the left side of the saw if your saw is right handed or opposite if your saw is left handed that will help you bring the saw completely to the bottom using both hands.
- You may like to do as I have and place a foot pedal momentary switch attached to the power saw. By doing so you can place a zip tie around the saw trigger and use the foot control for convenience.
- You may also like to attach a shop vac to your saw at the dust exit spot or hose connector. Be ingenious.
To convert from using the Maslow CNC router to Panel Saw.
- Disconnect the Router plate and store in safe place. Maybe on side support frame.
- Let chains dangle down from stepping motors.
- Install the Panels saw bottom frame.
- Slide rails with panel saw attached into the bottom rail support holes.
- Slide rails up to top rail support plate stops and secure bottom rail support stops. Connect counter weight cable and power cord.
- Reverse procedure for converting back to CNC router.